How to tie a tie correctly, and how does it affect your image?
Have you ever wondered why a tie remains an integral symbol of style and status even in today’s world, where fashion changes at lightning speed? This small accessory can radically change the impression of a person: emphasize seriousness, add confidence and even influence the outcome of negotiations. A correctly selected and tied tie not only decorates, but also creates the image of a successful, determined and professional person. That is why it is worth deeply understanding how to tie a tie correctly, what knots exist, how to choose the perfect model for the event, style and corporate dress code, and why branded ties and ties with a logo have become important elements of business and marketing.
Important business accessory: branded tie
A tie has long been considered a symbol of elegance. It appeared in Europe in the 17th century and has survived dozens of fashion revolutions. Today, despite the popularity of casual style, a tie remains one of the strongest markers of a business image. It personifies discipline, responsibility and attention to detail. For a man who wants to impress his interlocutors, knowing how to tie a tie and how to wear it correctly is a must.
In addition, a tie with a logo has become a tool of corporate culture. It demonstrates team unity, creates a sense of belonging, and at the same time emphasizes the professionalism of the company. A branded tie is no longer just an accessory, but a marketing tool that helps make the brand recognizable.
How to tie a tie with a logo correctly: basic rules
Properly tying a branded tie starts with basic principles.
- First, the length: the end of the tie should reach exactly to the belt buckle. If it is shorter, it creates a childish feeling, if it is longer, it looks sloppy.
- Secondly, the width: it should harmonize with the lapels of the jacket. Narrow models are suitable for modern fitted suits, wider ones for classic silhouettes.
- Thirdly, the tightness of the knot: too loose looks sloppy, and too tight creates discomfort. And most importantly, symmetry. The knot should look even and neat, even if it is the simplest Four-in-Hand.
Mastering these rules is the first step to looking confident.
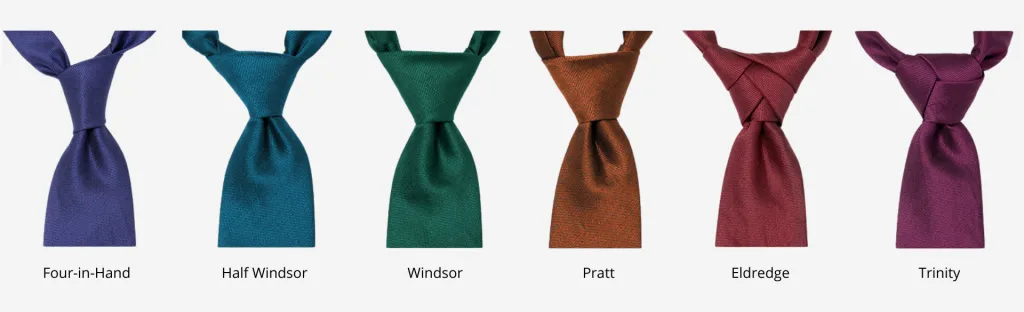 Six popular tie knots: Four-in-Hand, Half Windsor, Windsor, Pratt, Eldredge and Trinity
The most popular knots: step-by-step instructions
Each knot has its own history and special character. Knowing how to tie a tie correctly will help you choose the perfect option for any event.
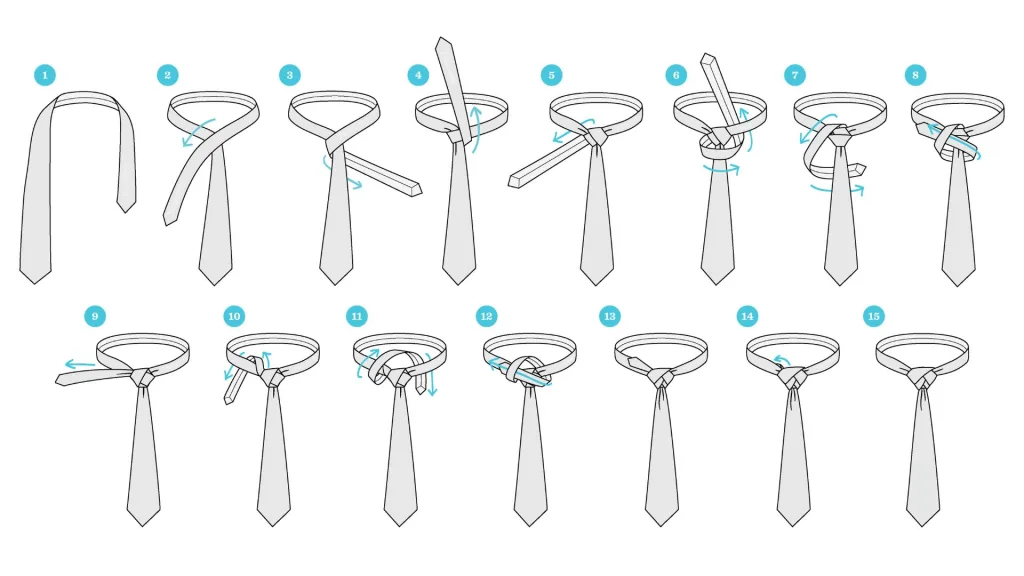
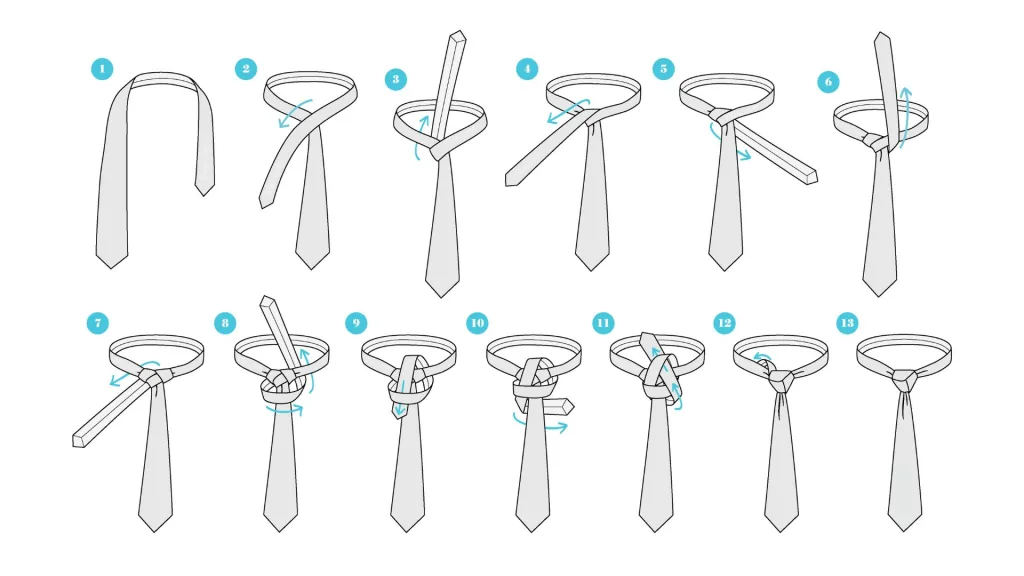
Simple Knot (Four-in-Hand)
A simple, asymmetrical knot that is suitable for everyday use. It emphasizes ease and adds charm. It is easy to tie even for beginners and looks perfect on narrow collars.
Instructions for tying a tie:
- Hang the branded tie around your neck so that the wide end is on the right and hangs lower than the narrow end (the narrow end is approximately at the level of your navel).
- Cross the wide end over the narrow end, moving from right to left.
- Bring the wide end under the narrow end and bring it out to the right.
- Pull the wide end through the narrow end again (right to left). A horizontal loop should form in front.
- Pull the wide end up through the loop near your neck.
- Put the wide end down through the loop formed at the front of the knot.
- Pull the wide end down, gently pull the knot up to the collar, and adjust it so it is symmetrical.
 Step-by-step instructions for tying a Four-in-Hand tie knot
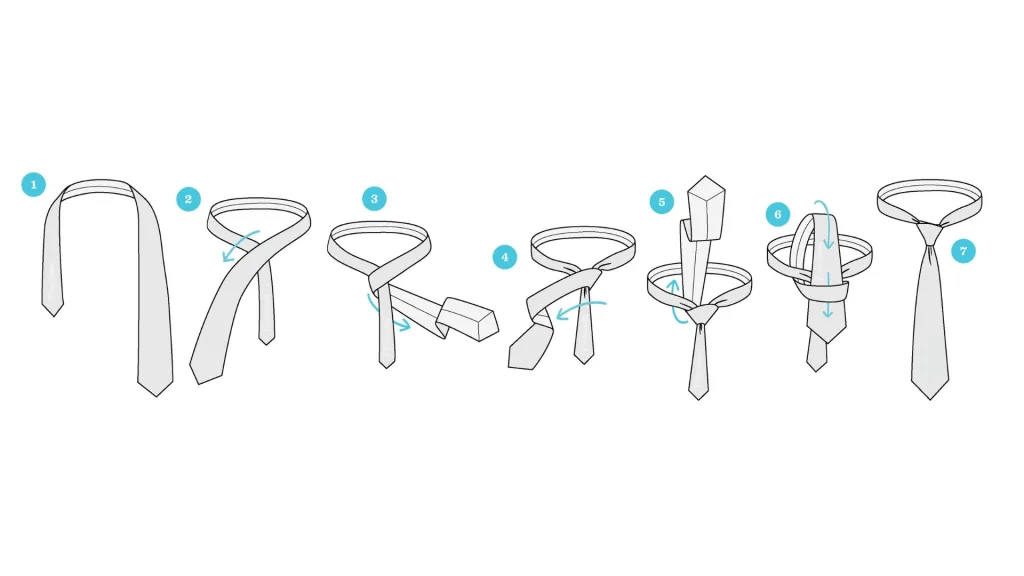
Half Windsor Knot (Half Windsor)
This medium-sized knot is symmetrical and elegant. The Half Windsor is often chosen for business meetings and negotiations. It creates a neat and balanced look.
Instructions for tying a tie:
- Hang the logo tie around your neck so that the wide end is on the right and longer than the narrow end.
- Cross the wide end over the narrow end.
- Bring the wide end under the narrow end and bring it out to the right.
- Pull the wide end up through the loop near the neck.
- Fold the wide end down to the left.
- Fold the wide end to the right in front.
- Pull the wide end up through the loop at the neck again.
- Put the wide end down through the front loop that was formed.
- Pull the wide end down, pull the knot up to your collar, and straighten it so it’s symmetrical and neat.
 Half Windsor tie knot
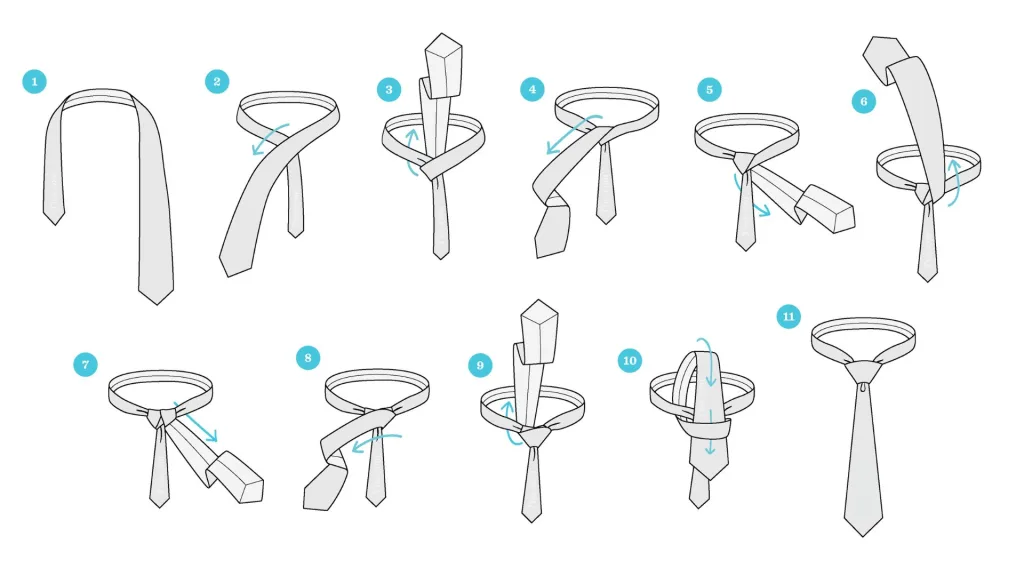
Windsor Knot (Windsor)
A true classic. A large, symmetrical knot that symbolizes strength and confidence. Suitable for formal events, performances, and important meetings. It is best to use thin fabrics to avoid bulkiness.
Instructions for tying a tie:
- Hang your branded tie around your neck with the wide end on the right and the narrow end on the left. The narrow end should touch just above your belly button. (This depends on your height, length, and thickness of the tie.)
- Pass the wide end over the narrow end, from right to left.
- Tuck the wide end under the narrow end and bring it up through the loop near your neck.
- Put the wide end down — to the left.
- Wrap the wide end around the back from the narrow end to the right side.
- Lift the wide end up to the center, towards the loop near the neck.
- Put the wide end through the loop near the neck and bring it down to the right.
- Bring the wide end through the front of the knot, from left to right, creating a horizontal strip across the front.
- Pull the wide end up through the loop at the neck again.
- Put the wide end down through the front loop you created.
- Tighten the knot, pull it up to the collar, and adjust it so that it is neat and symmetrical.
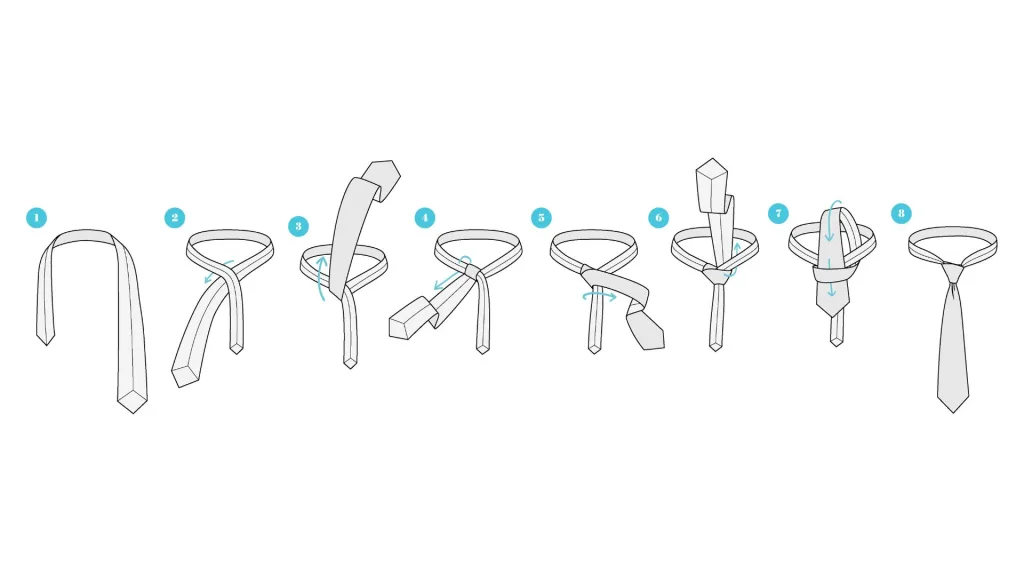
Pratt’s Knot (Windsor Pratt)
A neat knot that combines simplicity and versatility. The Pratt is easy to tie, symmetrical, and suitable for all styles, from formal to casual.
Instructions for tying a tie:
- Start with the back of the logo tie facing forward. The wide end is on the right, the narrow end is on the left. The narrow end should be just above your belly button (depending on your height and the length of the tie).
- Pass the wide end under the narrow end, moving to the left.
- Lift the wide end up to the center, towards the loop near the neck.
- Put the wide end through the loop near your neck and bring it down to the left.
- Put the wide end in front through the narrow end to the right.
- Pull the wide end up through the loop at the neck again.
- Put the wide end down through the loop you just created in front.
- Pull the wide end down, pull the knot up to your collar, and adjust so it is symmetrical and neat.
Eldredge Node (Eldredge)
A very creative knot that looks like weaving. It is chosen by those who want to make the tie the main accent of the image. The Eldredge requires practice, but the effect is impressive.
Instructions for tying a tie:
- Start with the wide end of the branded tie on the left, the narrow end on the right. Let the wide end touch the top of the belt buckle. The narrow end will be the active end – this is what you will work with next.
- Bring the narrow end over the wide end (to the left).
- Bring the narrow end under the wide end and then to the right.
- Lift the narrow end up to the center, to the loop near the neck.
- Put the narrow end through the loop near your neck and bring it to the left.
- Bring the narrow end to the right in front, then bring it up under the loop near your neck.
- Bring the narrow end down to the left side and loop it behind the wide end to the right side. Don’t pull that part too tight—it should be a little loose.
- Bring the narrow end to the front of the top and pass it through the loop created in the previous step.
- Pull the narrow end to the left to tighten the knot slightly.
- Bring the narrow end back up to the center, to the loop near the neck. Then lower it through that loop to the left.
- Once again, bring the narrow end up through the loop near the neck and lower it to the right. Keep the parts that need to be left loose so that the headboard pattern remains visible and aesthetic.
- Pull the narrow end of the front of the top through the loop created in the previous step.
- Pull the narrow end to the left to tighten this loop.
- Hide the remaining narrow end behind the loop near the neck on the left side.
- Straighten and tighten the knot as you pull it towards your neck. Make sure the knot looks clean, with a braid or fishtail pattern in the front.
 Step-by-step instructions for tying the Eldredge complex tie knot
Trinity Node (Trinity)
A spectacular knot resembling a triangle. It adds originality and is suitable for festive events, weddings and parties. Trinity creates a wow effect and demonstrates the creativity of the owner.
Instructions for tying a tie:
- Start with the wide end of the logo tie on the left and the narrow end on the right. The wide end should reach about the top of the belt buckle. The narrow end will be the working end.
- Bring the narrow end under the wide end to the left.
- Then thread it up through the loop near your neck.
- Fold the narrow end down to the left.
- Circle the narrow end behind the wide end to the right.
- Lift it up to the center and pass it through the loop near the neck.
- Fold the narrow end down to the right.
- Swipe it forward to the left.
- Pull the narrow end up again through the loop near the neck.
- Put the narrow end down through the loop you just made in front.
- Bring the narrow end behind the knot to the right.
- Bring it from the front to the center and push it through the loop created in the previous step.
- Carefully pull the knot tight and tuck the remaining narrow end behind the loop near your neck. Align the knot to form a symmetrical triangular shape.
- Detailed diagram and instructions for tying the Trinity tie knot
How to choose a tie with a logo for your look and event
Choosing the right branded tie for a specific look and event is an art that helps emphasize your style and status. If you are planning a business meeting or important negotiations, it is best to choose a classic tie in restrained colors: blue, black or burgundy. For solemn events, weddings or parties bright shades and original knots, such as Windsor or Trinity, will be appropriate. Everyday office style requires calmer colors and light prints that harmoniously combine with a shirt and suit. It is important to remember that a tie should match not only the event, but also your character: a tie with a logo will become a symbol of corporate unity, and a branded tie will emphasize the company’s image and demonstrate attention to detail. By choosing an accessory consciously, you will always look stylish, modern and confident. Learn more about other corporate accessories here.
Choosing fabric for a branded tie: jacquard, gabardine or satin?
The material of a tie has the greatest impact on its appearance and durability. Among the most popular and sought-after options are jacquard, gabardine, and satin.
Jacquard ties
Jacquard tie is considered a symbol of status and elegance. Its feature is that the pattern is formed directly on the looms during the weaving of threads, and is not printed on top. This makes the pattern voluminous, clear and resistant to wear. Jacquard branded ties hold the knot well (Windsor, Half Windsor, Eldredge) and look presentable even after prolonged use. Due to their texture, they are ideal for corporate accessories, because the company logo can become part of the fabric.
Gabardine ties
Gabardine ties are dense and durable. The fabric has a diagonal weave, which makes it more wear-resistant and resistant to deformation. Such ties are convenient for daily use in a corporate environment – they hold their shape well, do not wrinkle and maintain a neat appearance for a long time. Gabardine is great for branded accessories, because the logo applied by sublimation looks clear and retains color saturation.
Satin ties
Satin tie is a choice for formal and festive events. The smooth surface of the fabric reflects light, creating a spectacular shine and depth of color. Satin ties usually look bright and expensive, so they are often chosen for weddings, banquets, parties. However, satin is more delicate to care for, so for everyday wear it is better to choose gabardine or jacquard.

Colors and prints: the psychology of choice
The color of a branded tie is of great importance for shaping the image and creating the right impression. A correctly selected palette can emphasize status, confidence and even influence the emotions of the interlocutor. That is why, when choosing an accessory, it is important to know not only how to tie a tie, but also what color tie is best for a particular event.
Blue ties are a symbol of trust, stability, and professionalism. They are most often chosen for business meetings and negotiations, as they are associated with calm and confidence. A dark blue tie emphasizes restraint and authority, while a light blue creates a feeling of openness and friendliness.
Red ties are the choice of leaders and self-confident people. They represent strength, energy, and determination. A burgundy tie looks more restrained and elegant, suitable for a formal style, while a bright red one creates a sense of dynamism and charisma.
Black ties are associated with formality, rigor, and classicism. It is a versatile option for formal events, evening events, and corporate meetings. Black ties emphasize seriousness and are always appropriate in a business environment.
Green ties symbolize harmony, peace, and balance. A dark green tie looks solid and emphasizes stability, while light shades add freshness and lightness to the look.
Yellow and orange ties evoke associations with optimism, creativity, and friendliness. They are great for informal events and creative fields where you need to demonstrate openness and inspiration.
Purple ties are often associated with creativity, individuality, and a certain charm. Dark purple looks elegant and emphasizes intelligence, while light shades create a feeling of lightness and sophistication.
In addition to colors, prints on ties also play an important role.
-
- A striped tie symbolizes dynamism and purposefulness. It is ideal for business and corporate style.
-
- A checkered tie looks more formal and adds austerity to the look.
-
- A tie in polka dots creates a lighter and more creative mood, especially if the dots are contrasting.
-
- Geometric patterns or abstract drawings allow you to demonstrate individuality and creativity.
Care Tips: How to Store and Clean Logo Ties
Proper care of a tie extends its service life and helps maintain its impeccable appearance. The first rule is that a tie should always be untied after use. If you leave the knot tied, wrinkles and creases will appear on the fabric, which are difficult to eliminate. It is best to store the accessory in an upright position on a special hanger or rolled up in a case. This helps to avoid deformation and ensures proper air circulation.
As for cleaning, it all depends on the material. Silk and jacquard ties require careful care, so they should be dry-cleaned. Gabardine and satin ties can be cleaned by hand with mild detergents, avoiding aggressive chemicals. It is important to remember: you cannot iron a tie directly with an iron – it is better to use a steam generator or steamer. For corporate accessories, such as branded ties with a logo, proper care is especially important, because they must maintain a presentable appearance in a business environment.
Typical mistakes when tying and selecting branded ties
Many men do not even suspect that they make common mistakes when wearing a tie, and thus spoil their image. The most common mistake is the wrong length: when the end of the tie is too short or, conversely, too long. An equally common violation is the discrepancy between the width of the tie and the lapels of the jacket. For example, a narrow tie in combination with a wide classic suit looks disproportionate.
Another mistake is choosing prints that are too bright or extravagant for formal events. In a business environment, it is better to stick to classic colors and restrained patterns. You should also avoid sloppy tying: the knot should be symmetrical and neat. Often, beginners make it too tight or too loose, which looks unaesthetic.
It is important to remember: a tie is not just an accessory, but an element of style that forms the first impression. If you want to make a professional impression, learn how to tie a tie correctly, choose an accessory according to the event and avoid common mistakes. And for companies, the best choice will be a tie with a logo or branded tie, which combine style, corporate unity and marketing value.
A tie is an accessory that shapes your image. It affects the way others perceive you, so it’s important to know how to tie a tie, what knots are appropriate, how to choose the material and color. For business, logo ties and branded ties are of particular importance, because they not only create style, but also work for the company’s marketing. Learn more about making corporate ties with a logo, which will become an important element of your company’s style.